# Components
## Purpose
Sometimes you have to disable one or more features because you currently don't need/want them, or they currently do not work like expected and it is better to disable them completely.
Removing them immediately is often the best solution, but in normal code, this can be quite hard, or even impossible, on runtime!
Here are the components, which are allowing you, to put your code inside little parts of the plugin, which can be individually managed and viewed, so you can disable specific parts of the plugin, without having to update the plugin immediately.
It can also help, to provide features, that only a specific group of people need, so that the people, which want the specific features, can choose to enable these features.
## The control
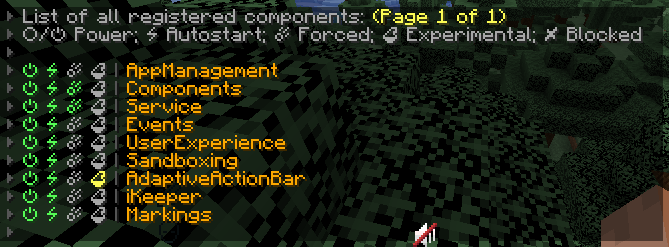
Output of the /component list interchange
The components can be viewed and managed via the /component interchange.
With `/component list` you can see a list full of components. All the running and currently not running components are listed here, with each having multiple indicators, showing their current status and behavior.
## The code
```kotlin
class MyComponent : Component(
behaviour = RunType.DISABLED,
isExperimental = false,
preferredVendor = null,
) {
override val label = "MyComponent"
override suspend fun start() {
// start logic
}
override suspend fun stop() {
// stop logic
}
}
```
### #behavior
The behavior constructor parameter defines, how the component is reacting to a start & stop!
These are the available RunType behaviors:
{% tabs %}
{% tab title="DISABLED" %}
The component is not starting by default, but can start via the component interchange or by enabling autostart of this component!
{% endtab %}
{% tab title="AUTOSTART\_MUTABLE" %}
The component is automatically inside the autostart process but can be removed from the autostart list.
{% endtab %}
{% tab title="AUTOSTART\_IMMUTABLE" %}
The component is inside the autostart list by default and cannot be removed from it! It is always starting with the plugin!
{% endtab %}
{% tab title="ENABLED" %}
The component is always starting with the server and additionally, cant is stopped. So this component is running ALWAYS!
*\*blocking may completely remove this component and then not start anymore!\**
{% endtab %}
{% endtabs %}
### #isExperimental
With this property, you can inform your users, if you consider describing your code, inside the component, as experimental to use.
This also allows you to ship your plugin with code, which may not work like expected and inform your users to use the component with caution!
### #preferredVendor
By default, the vendor, who registers the component, is used, as the component vendor. But if you want to force a specific vendor, you can specify it via this property.
### #label
The display name of the component is also used at the key generation of this component, so please do not use special characters!
### start()
Specify here, what happens, if the component gets started.
Maybe things like registering/starting interchanges & services?
### stop()
Specify here, what happens, if the component gets stopped.
Maybe things like unregistering/stopping interchanges & services?
## SmartComponents
Okay, okay, registering everything on your own, defining what has to happen and other stuff can get quite uncomfortable! What would be, if these things can happen automatically? Here it is, the `SmartComponent`!
Now the structure of the Component gets quite handy, take a look:
```kotlin
class MyComponent : SmartComponent(
behaviour = RunType.DISABLED,
isExperimental = false,
preferredVendor = null,
) {
override val label = "MyComponent"
override suspend fun component() {
// build your component here!
}
}
```
The constructor of the SmartComponent may be the same as the Components constructure, but the start and stop functions got replaced by the component() function.
Inside this function, you can define, which interchanges, other components and services have to be registered under this component!
Here are the functions, to use, to build your component:
* interchange(Interchange...) -> Add interchanges to your component
* service(Service...) -> Add services to your component
* component(Component...) -> Add other components to your component
* listener(EventListener...) -> Add event listeners to your component
* sandbox(SandBox...) -> Add sandboxes to your component
All of these things are getting registered on start and removed on stop of the component, so that they are all managed via the life of the component.
But what if you want to have some special things also done by your component? Just use the
* additionalRegister(...) function, to execute code on the registering process
* additionalStart(...) function, to execute code on the starting process
* or the additionalStop(...) function, to execute code on the stopping process
This was the smart component, which does the most for you automatically!
---
# Agent Instructions: Querying This Documentation
If you need additional information that is not directly available in this page, you can query the documentation dynamically by asking a question.
Perform an HTTP GET request on the current page URL with the `ask` query parameter:
```
GET https://moltenkt.gitbook.io/sparkle/apps/components.md?ask=
```
The question should be specific, self-contained, and written in natural language.
The response will contain a direct answer to the question and relevant excerpts and sources from the documentation.
Use this mechanism when the answer is not explicitly present in the current page, you need clarification or additional context, or you want to retrieve related documentation sections.